Setting Up Swap Memory on a Separate EBS Volume (Amazon Linux 2023)
Add swap to your EC2 instance without touching the root volume — here's how to set it up on a dedicated EBS volume with Amazon Linux 2023.
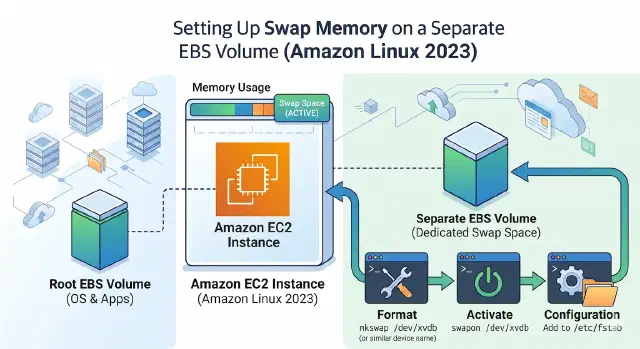
Running out of memory on a small EC2 instance? Adding swap on a separate EBS volume is a clean way to handle it without resizing the root disk. Keeping swap on its own volume means you can detach, resize, or snapshot it independently from your root filesystem. Here’s how to do it on Amazon Linux 2023.
Prerequisites
- AWS CLI configured with the right profile
- A running EC2 instance
- SSH access to the instance
1. Find Your Instance’s Availability Zone
EBS volumes are tied to a specific AZ, so your swap volume must be created in the same AZ as the instance you want to attach it to. Run this to find out where your instance lives:
aws ec2 describe-instances \
  --instance-ids i-xxxxxxxxxxxxx \
  --query "Reservations[0].Instances[0].Placement.AvailabilityZone" \
  --output text \
  --profile your-profile
Note that AZ names like ap-southeast-2a are mapped per-account, so the same AZ name can point to different physical zones for different AWS accounts.
2. Create the EBS Volume
Create a small gp3 volume in the correct AZ. A few GB is usually enough for swap on a small instance, but match the size to your workload - AWS generally recommends swap roughly equal to RAM.
aws ec2 create-volume --profile your-profile --availability-zone ap-southeast-2a --size 4 --volume-type gp3 --tag-specifications 'ResourceType=volume,Tags=[{Key=Name,Value=swap-volume}]'
Use a single line to avoid shell continuation issues with zsh on macOS. Save the returned VolumeId - you’ll need it for the next step.
3. Attach the Volume to Your Instance
Attach the new volume to your EC2 instance. The --device value (like /dev/sdf) is a hint to AWS, but on modern Nitro-based instances the kernel will actually expose it as an NVMe device.
aws ec2 attach-volume \
  --profile your-profile \
  --volume-id vol-xxxxxxxxxxxxx \
  --instance-id i-xxxxxxxxxxxxx \
  --device /dev/sdf
The attachment usually completes within a few seconds. You can verify the volume state moves to in-use via the AWS Console or describe-volumes.
4. Verify the Device on the Instance
SSH into the instance and list block devices to confirm the new volume showed up. On Nitro instances (t3, m5, c6i, and most modern types), the root volume appears as nvme0n1 and your new swap volume as nvme1n1.
lsblk
Then make sure the volume is empty before formatting it - you really don’t want to wipe a volume that already has data:
sudo file -s /dev/nvme1n1
Expected output: /dev/nvme1n1: data. This means there’s no filesystem on it yet and it’s safe to format.
5. Format and Enable Swap
Format the volume as swap space and enable it immediately. The mkswap command writes a swap signature to the device, and swapon tells the kernel to start using it.
sudo mkswap /dev/nvme1n1
sudo swapon /dev/nvme1n1
Confirm swap is active and check your memory layout:
swapon --show
free -h
You should now see the new swap space listed in both outputs.
6. Make It Persistent
Swap activated with swapon doesn’t survive reboots, so we need to add an entry to /etc/fstab. First, get the volume’s UUID - using UUIDs is safer than device names, which can change between reboots.
sudo blkid /dev/nvme1n1
Open fstab in your editor:
sudo nano /etc/fstab
Add this line at the bottom, replacing the UUID with the one from blkid:
UUID=your-uuid-here none swap sw,nofail 0 0
The nofail flag is important - it lets the system boot even if the swap volume isn’t attached for some reason. Without it, a missing volume can leave you stuck at boot.
7. Test fstab Without Rebooting
Always test your fstab changes before rebooting. A broken fstab can leave your instance unbootable, and recovering an EC2 instance from a bad fstab is annoying.
sudo swapoff /dev/nvme1n1
sudo swapon -a
swapon --show
If swap shows up again after swapon -a, your fstab entry is correct and will work on reboot.
8. Tune Swappiness (Optional but Recommended)
The default Linux swappiness is 60, which is too aggressive when swap lives on EBS. Lowering it tells the kernel to prefer keeping things in RAM and only spill to swap when really necessary.
echo 'vm.swappiness=10' | sudo tee /etc/sysctl.d/99-swap.conf
sudo sysctl --system
Verify the new value is applied:
cat /proc/sys/vm/swappiness
Should return 10. This setting also persists across reboots thanks to the file in /etc/sysctl.d/.
Notes
- EBS-backed swap is significantly slower than RAM and consumes IOPS on the volume. Use it as a buffer against OOM kills, not as a substitute for actual memory.
- If your instance is constantly hitting swap, that’s a sign you should resize to a larger instance type instead.
gp3gives you better baseline performance thangp2at the same or lower cost - there’s no reason to usegp2for new volumes.- Remember that the swap volume must be in the same AZ as your instance, and you’ll be billed for it separately from the root volume.
That’s it - your instance now has dedicated swap that survives reboots and won’t slow down your root volume’s IOPS.